LNMP开发环境搭建——配置nginx+php-fpm
2016-6-30 邪哥
配置 nginx + php-fpm web服务
首先咱们完善之前的内容,设置并启动php-fpm服务
[root@localhost ~]# cd /usr/local/php/php5.4.45/etc/
[root@localhost etc]# cp php-fpm.conf.default php-fpm.conf
#如果你想尝试修改配置文件,并确保修改正确,可以使用php-fpm -t进行测试
#当然你可以直接使用绝对路径,如果想方便,同理需要配置一下环境变量
[root@localhost etc]# vi /etc/profile
# 同之前的,完善文件底部内容 如下:
PATH=/usr/local/nginx/sbin:/usr/local/mysql/bin:/usr/local/php/php5.4.45/bin:/usr/local/php/php5.4.45/sbin:$PATH
export PATH
#完成后保存退出
[root@localhost etc]# source /etc/profile
[root@localhost etc]# php-fpm -t
[30-Jun-2016 17:04:27] NOTICE: configuration file /usr/local/php/php5.4.45/etc/php-fpm.conf test is successful
[root@localhost etc]# cd ~/soft/php-5.4.45
[root@localhost php-5.4.45]# cp sapi/fpm/init.d.php-fpm /etc/init.d/php54-fpm
[root@localhost php-5.4.45]# chmod +x /etc/init.d/php54-fpm
#接下来就可以使用service工具进行php-fpm的管理了,为了后续学习区分 这边同样使用了 php54-fpm
[root@localhost etc]# service php54-fpm status
php-fpm is stopped
[root@localhost etc]# service php54-fpm start
Starting php-fpm  done
[root@localhost etc]# cd ~
然后咱们对nginx的配置进行修改补充
[root@localhost ~]# cd /usr/local/nginx/conf
#为了方便以后的学习及配置新增,咱们对nginx.conf文件稍作修改
[root@localhost conf]# vi nginx.conf
#在文件末尾,倒数第二行 加入如下配置
include vhosts/*.conf;
#完成后保存退出
[root@localhost conf]# mkdir vhosts
[root@localhost conf]# vi vhosts/test.local.com.conf
#样例配置文件,写入如下内容
server
{
    listen       80;
    server_name  test.local.com;
    index index.php;
    root  /data/www/test.local.com;

    location ~ [^/]\.php(/|$)
    {
      fastcgi_pass  127.0.0.1:9000;
      fastcgi_index index.php;
      include fastcgi.conf;
    }

    access_log  off;
}
#完成后保存退出
到这边先别急噢,咱们还需要添加目录及访问文件,重载nginx配置等,如下
#添加默认访问文件
[root@localhost conf]# mkdir -p /data/www/test.local.com/
[root@localhost conf]# cd /data/www/test.local.com/
[root@localhost test.local.com]# vi index.php
#写入如下内容
<?php
echo __FILE__;
phpinfo();

#完成后保存退出

[root@localhost conf]# nginx -t
nginx: the configuration file /usr/local/nginx/conf/nginx.conf syntax is ok
nginx: configuration file /usr/local/nginx/conf/nginx.conf test is successful
#如果你还没启动nginx 则启动
[root@localhost conf]# nginx
#若nginx已经启动,则重新加载配置
[root@localhost conf]# nginx -s reload
你可能在前面就想问 test.local.com 又不是我的域名,怎么能设置成它呢
ok,其实这边就是拿来做一个简单的样例,当然你可以修改为你自己想要的,localhost或ip,也可以设置访问端口
这边我们通过修改hosts文件,来实现本地测试环境的自由配置
[root@localhost test.local.com]# vi /etc/hosts
#在文件末尾添加以下内容
127.0.0.1  test.local.com
#完成后保存退出
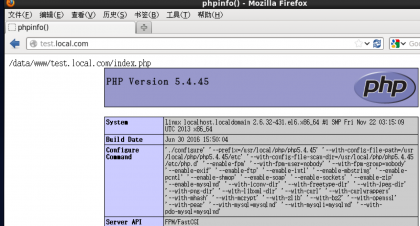
现在打开浏览器,输入test.local.com 访问看看
看到效果了,完成
ps: 如果实际项目中出现 rewrite 403 问题,请留意优先复核 php.ini 中的 cgi.fix_pathinfo 是否是正常开启的。然后再核查其他可能性
更多的配置 如重写规则 使用 socket 监听, 静态文件的缓存设置 等等,可以留言交流,后续的章节也会陆续涉及到,当然你也可以参考相关更详细权威的文档 :)
Thanks for your kindness :)
sometimes
then
How about you ?


发表评论: